Thursday, July 28, 2016

Tequila Lime Grilled Flank Steak


This summer we have been all about grilled meat, chicken or fish with simple salads and grilled veggies. One of my husband's favorites is grilled flank steak. We have had it several times over the past few months, but the one he made last week was by FAR the best! You HAVE to try this marinade!


He created one of his amazing marinades using mostly tequila and lime. He let it marinate overnight for a total of 20 hours and man did that steak take on some amazing bright and zesty flavors!


He takes great pride in his grill marks. Halfway through cooking on one side, he will turn the meat 90 degrees to get those beautifully crossed grill marks. And since we both like our steak cooked differently - I prefer medium well (I know, I know - I'm working on that!) whereas he prefers medium - this flank steak was perfect because the edges cooked a touch more for me, so we were both happy.

This was a huge piece of steak - look at the shape on this thing!


This marinade is so simple - you have to try it. I will file this recipe under to many categories - summer cookout, entertaining/dinner party, easy weeknight meal, summer meal and makes great leftovers. On day 2, put some of the sliced steak over a salad for lunch, or make tacos, quesadillas, or fajitas.

Enjoy!


Tequila Lime Grilled Flank Steak
Original Recipe by Jon of Mary Ellen's Cooking Creations

Ingredients

  • 2-lb flank steak
  • 1/4 c Olive oil
  • 1.5 oz Tequila
  • 3 Cloves of garlic, minced
  • Juice of 1 lime
  • Zest of 1 lime
  • A few pinches each salt and freshly ground black pepper
Directions

  • Mix all of the marinade ingredients. Place flank steak in a gallon Ziploc bag or shallow dish. Pour marinade over the steak and marinate in the fridge for at least 8 hours, up to 24 hours. 
  • Heat grill to high
  • Remove steak from the marinade and place on a hot grill. Be careful - the tequila in the marinade will make your grill flare up a bit!
  • Grill 8 minutes per side turning 90 degrees halfway through for good grill marks
  • Let rest 10 minutes before thinly slicing across the grain

Wednesday, July 20, 2016

Grilled Halibut with Lemon-Herb Butter


Halibut is the perfect fish for the grill. Like sea bass or swordfish, it is dense and firm so it holds up well when grilling. However, even though it is dense, when cooked it is light and flaky.

My husband could eat fish every night, but we usually stick to 1-2x per week. Last week he picked up some halibut and made a lemon-herb butter that was spread across the fish before grilling.


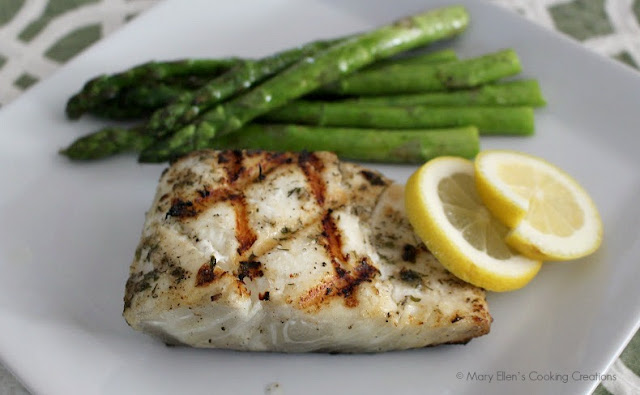
While the fish was grilling skin side down first, all of the butter melted into the fish. The bright lemon highlighted the light and fresh flavors of the fish, and the herbs were fragrant but in no way overpowering.


Look how perfectly that fish flakes!


With some grilled asparagus on the side, this really was the perfect, healthy summer meal.


Grilled Halibut with Lemon-Herb Butter
Adapted from: All Recipes

Ingredients (for 2)

  • 2 one-inch thick halibut steaks
  • 1/2 c butter, softened
  • 1 Tbsp lemon juice
  • Zest from 1/4 of the lemon
  • 1 tsp onion powder
  • 1/2 tsp garlic powder*
  • 1 tsp dried parsley*
  • 1/2 tsp dried dill weed*
  • Salt, to taste
  • A few turns of fresh cracked black pepper
  • Fresh lemon slices
*of course fresh can be used, as well, depending on what you have on hand

Directions
  • Preheat your grill to high and rub the grates with vegetable oil (put some on a paper towel and use tongs to hold the paper towel as you run it along the grates)
  • Mix the softened butter with the lemon juice, zest, onion  powder, garlic powder, parsley, dill, salt and pepper. 
  • Wash and dry your fish, and then spread the butter mixture evenly over the steaks
  • Cook until the fish flakes easily with a fork (skin side down first), about 5-6 minutes per side.
  • Serve with fresh lime slices for squeezing 


Monday, July 18, 2016

Peanut Butter and Banana Granola Bars

Healthy homemade granola bars you can feel good about! Nuts, peanut butter, honey bananas and fruit. No sugar! #granolabars

I have always wanted to make my own granola bars. Something healthy, and something I can feel good about eating and giving to my daughter. You can definitely feel good about these bars, packed with real, healthy ingredients and no added sugar. 


The granola bars I made started with toasting walnuts and oats with some cinnamon.
 

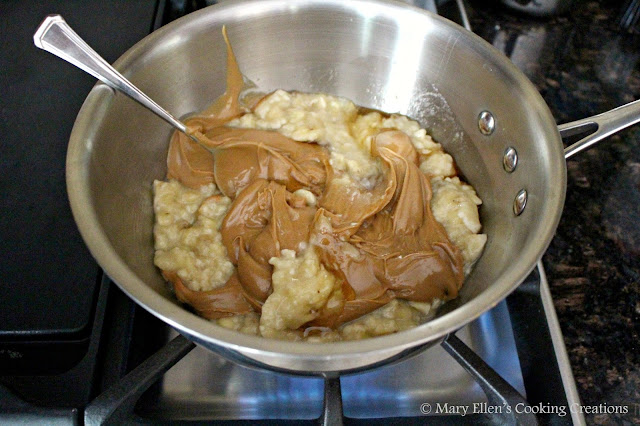
The glue that brings it all together is a mixture of mashed banana, peanut butter, vanilla and honey.
 

For another texture, I added dried mixed fruit - raisins, cranberries, and golden raisins. 


Once everything is combined you spread it out in a baking dish lined with parchment paper. It bakes in the oven for 25 minutes. Once cool you put the dish in the fridge to set. 


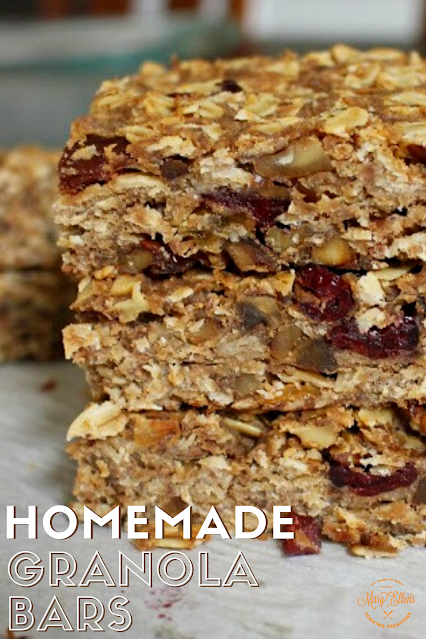
I was worried that they would crumble or fall apart once I took them out but nope - look at this huge bar! I used a glass Pyrex baking dish so my bars were on the thicker side. I cut this large bar into 9 bars. For thinner bars, you could use a cookie sheet with a short edge. 


These bars are dense but very tasty and filling. They are not sweet at all so if you are looking for something like the big brand, storebought bars, you'll need to add a bunch more sugar. But if you are looking for a healthy, good for you bar with lots of textures and flavors, this is it! 

Peanut Butter and Banana Granola Bars
Adapted from: Spoon University

Ingredients
  • 2 cups of rolled oats
  • 1 c chopped walnuts
  • 1 tsp ground cinnamon
  • 3 ripe bananas
  • 1 Tbsp honey
  • 1 c creamy, natural peanut butter
  • 1/2 tsp vanilla extract
  • 1/2 c mixed dried fruit (I used the raisins, golden raisins, cranberries mix from Trader Joe's)
Directions
  • Preheat your oven to 350 degrees F
  • Mix your oats with the nuts and cinnamon. Spread on a cookie sheet and place in the oven to toast for 12 minutes, stirring every 3 minutes.
  • Mash your bananas with a fork. Mix the bananas, peanut butter, vanilla extract and honey in a saucepan over medium heat. Stir constantly until combined and warm, about 5 minutes.
  • Place the oat/nut mixture in a large bowl and mix in the berries. Pour in the banana/peanut butter mixture and stir until fully combined.
  • Line a baking sheet or glass baking dish (the size is up to you!) with parchment paper. Spread the granola mixture out evenly in your dish, using the back of a spatula to flatten.
  • Bake for 25 minutes. Let cool completely and then place in the fridge for at least 30 minutes. 
  • Remove the bars from your dish using the parchment paper ends as handles. Use a sharp knife to cut the granola into bars. 
Healthy homemade granola bars you can feel good about! Nuts, peanut butter, honey bananas and fruit. No sugar! #granolabars

Healthy homemade granola bars you can feel good about! Nuts, peanut butter, honey bananas and fruit. No sugar! #granolabars

Wednesday, July 13, 2016

Korean Pulled Pork Tacos with a Creamy Sriracha Slaw


This meal combines so many great flavors and textures - tender pulled pork slow cooked in sweet and salty ingredients. A crunchy slaw tossed in a creamy, spicy dressing with bright cilantro. A sticky, sweet and salty sauce to pull it together, and all wrapped in a soft corn tortilla.


As soon as I took my first bite I was in love. These tacos really do have everything. And once I was done eating I couldn't wait for the next night to have leftovers.


 It's a super easy dish to pull together since the pork cooks all day in your slow cooker. I bought a bag of broccoli slaw and tossed it with a homemade sriracha mayo at the last minute. And the sticky sauce can be made ahead of time and then warmed up when you are ready to eat. It doesn't get any easier!

Do yourself a favor and put these on your menu now!


Korean Pulled Pork Tacos with a Creamy Sriracha Slaw
Loosely adapted from: Eating Richly

Pork Ingredients

  • 2 lb pork - I actually prefer to use a pork loin for pulled pork instead of a fatty shoulder or butt.
  • Kosher salt and freshly ground black pepper
  • 1 yellow onion thickly sliced
  • 2/3 c Hoisin sauce
  • 1/2 c soy sauce
  • 1/2 c water
  • 1/4 c mirin
  • 1 Tbsp sesame oil
  • 1 Tbsp rice wine vinegar
  • 2 Tbsp worcestershire sauce
  • 1 tsp ginger powder
  • 4 cloves garlic, minced
All other ingredients
  • 1/2 bag broccoli slaw (mixture of broccoli, carrots, green and red cabbage)
  • 3 Tbsp mayonnaise
  • 1 Tbsp Sriracha sauce
  • Handful of fresh cilantro, chopped
  • Lime slices
  • Optional: picked radishes or pickled red onions
  • Corn tortillas
Directions
  • Prep and cook the pork: Mix the hoison, soy sauce, water, mirin, sesame oil, rice wine vinegar, ginger and garlic. Place onions in the bottom of your crock pot. Season the pork with salt and pepper and place on top of the onions. Pour half of your cooking liquid all around the pork, reserving the rest of the liquid. Cook on high for 2 hours and turn to low for 4-5 hours. Flip the pork halfway through cooking. Shred with 2 forks. 
  • Pour the rest of the cooking liquid into a small sauce pan. Heat over low heat for 30 minutes, stirring often, reducing it to a sticky sauce. Store in the fridge until ready to eat. Reheat slowly on the stove before serving.
  • Mix the mayo and sriracha. Toss with the slaw. 
  • Soften your corn tortillas by placing them in a hot, nonstick pan for 30 seconds per side.
  • Layer your taco with the pork, sticky sauce, slaw, cilantro, and lime juice. 


Slow cooker pulled pork with a creamy & crunchy sriracha slaw - Korean Pulled Pork Tacos #pulledpork #tacos #sriacha #slaw


Slow cooker pulled pork with a creamy & crunchy sriracha slaw - Korean Pulled Pork Tacos #pulledpork #tacos #sriacha #slaw


Wednesday, July 6, 2016

Lemon Garlic Roasted Potatoes


I tend to make roasted potatoes in the fall and winter as they can be a bit heavy and you need to keep your oven on for a while. Using small, new potatoes cuts the time in half, and the flavors of lemon and garlic turned these roasted potatoes into a summery side.


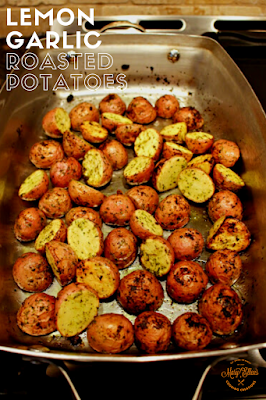
I used my handheld immersion blender to combine lemon juice, zest, garlic, parsley with some oil, salt and pepper. A quick toss with the potatoes and then into the oven for 20-25 minutes - look at these beauties!


Using a metal pan for roasting really helps to give these potatoes a nice crust on the cut side. Start with them cut side down before tossing them around halfway through the cooking.

These potatoes are the perfect summer side and the leftovers go great with eggs for breakfast!


Lemon-Garlic Roasted Potatoes
Original Recipe by Mary Ellen of Mary Ellen's Cooking Creations

Ingredients
  • 1/2 lb baby red/new potatoes, halved
  • 1/4 c olive oil
  • Handful of fresh parsley
  • Zest of 1/4 of a lemon
  • Juice of 1/4 of a lemon
  • 3 cloves of garlic
  • Salt and pepper
Directions
  • Preheat oven to 425 degrees F
  • Using a food processor or handheld immersion blender, combine the oil, parsley, lemon zest and juice, garlic, and several pinches each of salt and pepper
  • Toss the potatoes with the mixture in a large bowl
  • Transfer to a metal roasting pan, cut sides down, and season with a touch more salt and pepper
  • Roast for 20-25 minutes, flipping the potatoes once halfway through, until crispy on the outside and cooked through on the inside. 
Crispy lemon garlic roasted tomatoes. Perfect potato side dish #potatoes #roastedpotatoes


Crispy lemon garlic roasted tomatoes. Perfect potato side dish #potatoes #roastedpotatoes